
Side Dishes
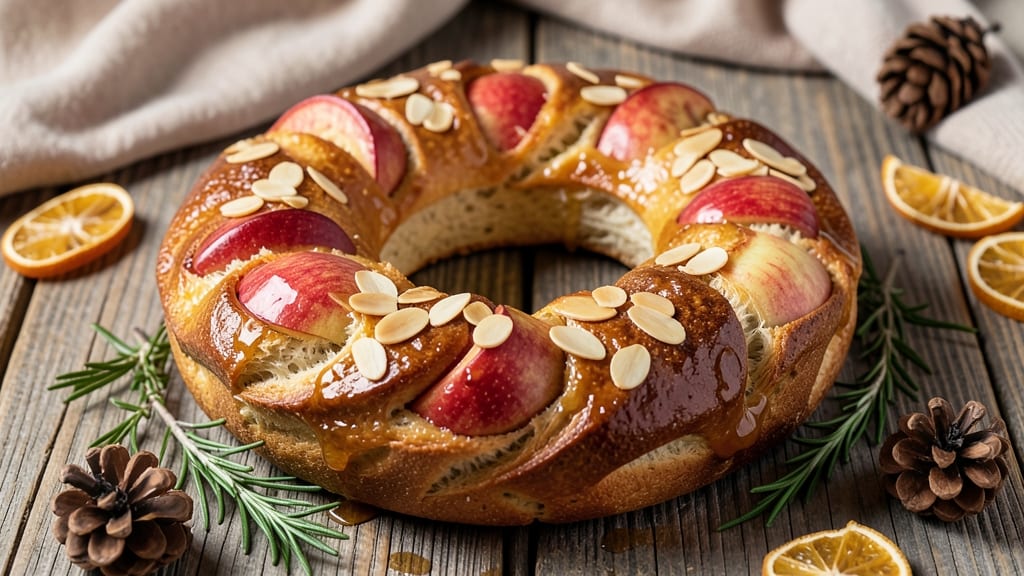
This autumn apple bread wreath transforms seasonal produce into a stunning centerpiece that doubles as edible decor. 🍂 The secret lies in combining tender brioche dough with caramelized apple filling, wrapped into a rustic crown that smells like a spiced orchard.
I designed this recipe after realizing how much more festive a table feels with a show-stopping centerpiece that guests can actually eat.
The dough gets its signature texture from a mix of all-purpose flour and a touch of honey, while the apple filling balances sweetness with warm cinnamon and nutmeg.
What makes this wreath special is how the dough holds its shape during baking, creating those beautiful leaf-like patterns while staying soft enough to slice. The filling caramelizes just enough to create pockets of gooey apple goodness in every bite.
By the time it emerges from the oven, you'll have a golden wreath with crisp edges and tender centers, crowned with toasted nuts and a light dusting of powdered sugar. It's the kind of centerpiece that makes your fall gatherings feel extra special—visually striking yet completely functional.
The best part? It's easier to assemble than it looks, with techniques that even beginner bakers can master.
Serve it warm with whipped cream or cheese for dipping, or let it cool slightly for elegant slices. This wreath makes an impressive centerpiece for Thanksgiving tables, holiday brunches, or any autumn celebration. The aroma alone will have your guests reaching for seconds before the first slice is even served.
Ingredients for autumn apple bread wreath
Four apples and a handful of pantry staples create this showstopping autumn centerpiece.
| Ingredient | Amount | Notes |
|---|---|---|
| All-Purpose Flour 🌾 | 3 ½ cups | Sifted for light texture |
| Granulated Sugar 🍚 | ½ cup | For dough sweetness |
| Honey 🍯 | ¼ cup | For brioche richness |
| Active Dry Yeast 🍞 | 2 ¼ tsp | Instant yeast works too |
| Warm Whole Milk 🥛 | ¾ cup | 110°F for activation |
| Unsalted Butter 🧈 | ½ cup | Softened, not melted |
| Large Eggs 🥚 | 2 whole | Room temperature |
| Vanilla Extract 🌸 | 1 tsp | Pure vanilla preferred |
| Apples 🍎 | 4 medium | Honeycrisp or Granny Smith |
| Granulated Sugar 🍚 | ¼ cup | For apple filling |
| Ground Cinnamon 🌿 | 1 ½ tsp | Plus extra for sprinkling |
| Ground Nutmeg 🌿 | ½ tsp | Freshly grated preferred |
| Toasted Walnuts 🌰 | ½ cup | Chopped for garnish |
| Powdered Sugar 🍚 | ¼ cup | For dusting |
| Salt 🧂 | 1 ½ tsp | Kosher preferred |
The apples are non-negotiable for this recipe—Honeycrisp or Granny Smith hold their shape best during baking. Local farmers markets often have perfect apples in fall, but the grocery store produce section works too. Look for firm, unblemished fruit with vibrant color. The walnuts? Costco or bulk bins are your best bet for freshness and price. Toast them yourself—just 5 minutes in a dry pan until fragrant. The honey should be raw and unfiltered for that deep, rich flavor that makes the dough extra tender.
No walnuts? Pecans or candied pecans work perfectly—just toast them first. Swapping apples? Pears or persimmons add a different twist, but stick to firm varieties. The dough calls for active dry yeast, but instant yeast works at the same amount—just skip the proofing step. For a gluten-free version, swap the all-purpose flour for a 1:1 gluten-free blend. The powdered sugar can be omitted if you prefer a rustic look, but trust me, that final dusting makes it look like a bakery masterpiece.
The dough keeps for 2 days in the fridge wrapped tightly, but make it fresh for best texture. The finished wreath stays fresh for 3 days at room temperature, wrapped in plastic. For longer storage, slice and freeze the bread—it reheats beautifully in the oven. I always make an extra small wreath to give away; it's the kind of thing people will remember from your holiday table. The scent alone lingers for days, filling your home with autumn warmth.
Why You'll Love This Recipe
- No Yeast Stress: I swear by this dough—just toss in the warm milk, let the yeast wake up for 10 minutes, and you’re done fussing. No kneading, no waiting hours, just a quick mix and rise while you sip coffee.
- Honey-Sweetened Magic: That honey isn’t just for flavor—it keeps the bread moist for days and gives it a caramelized crust when baked. Trust me, the first slice is the one that’ll make you rearrange your schedule for seconds.
- Party or Pantry: Slice it thick for a showstopper centerpiece, or pack it in lunchboxes—it’s the same dough, just different vibes. My kids beg for it at school, and my in-laws think I’m a genius when I bring it to Thanksgiving.
- Budget Baked Good: Five ingredients, zero waste. That honey and milk stretch farther than you’d think, and the bread freezes like a dream. I’ve fed a crowd for under $10 and still had leftovers for breakfast the next week.
Step-by-step instructions for crafting an autumn apple bread wreath
Here's how to transform simple ingredients into a showstopping centerpiece that smells as good as it looks.
👨🍳 Step 1: Prepare the Spiced Apple Filling
Core and peel the 4 medium apples, then cut them into small chunks about ½-inch in size. In a medium bowl, combine the apple chunks with 0.25 cup granulated sugar, 1.5 tsp ground cinnamon, and 0.5 tsp ground nutmeg. Toss gently until the apples are evenly coated in the spice mixture. Let this sit for 10 minutes while you prepare the dough—this gives the apples time to soften slightly and release their juices.
Here's the thing—don't skip the tossing. You want every apple piece to get that perfect spice coating. If you're using particularly tart apples like Granny Smith, you might want to add an extra pinch of cinnamon to balance the flavor. This filling is what gives your wreath that warm, autumnal aroma that'll have guests asking what's for dinner.
👨🍳 Step 2: Mix the Brioche-Inspired Dough
In a large mixing bowl, combine the 3.5 cups all-purpose flour (sifted for that light texture), 1.5 tsp salt, and 2.25 tsp active dry yeast. Make a well in the center and add the 0.5 cup softened unsalted butter, 0.5 cup granulated sugar, and 0.25 cup honey. Mix with a wooden spoon until you have a shaggy dough.
In a separate small bowl, whisk together the 2 whole large eggs and 1 tsp vanilla extract, then add the 0.75 cup warm whole milk. Pour this egg mixture into the flour mixture and stir with a wooden spoon until everything comes together. The dough will be sticky—this is normal. Turn it out onto a lightly floured surface and knead for about 8-10 minutes until smooth and elastic.
🥘 Step 3: Shape and Proof the Dough
Divide the dough into 4 equal pieces (about 1 pound each) and roll each piece into a 12-inch circle on a parchment-lined baking sheet. Here's where it gets fun—press your thumb into the center of each circle to create a well about 3 inches wide. This well will cradle your apple filling and create that beautiful wreath shape.
Cover the shaped dough with a clean kitchen towel and let it proof in a warm place for 1 hour or until it rises noticeably. You'll know it's ready when the dough springs back slowly when poked with a finger. This proofing step is crucial—it develops the gluten structure that'll give your wreath that perfect rise and tender crumb.
🍳 Step 4: Assemble and Bake the Wreaths
Preheat your oven to 375°F. Spoon the prepared apple filling into the center of each dough circle, pressing down gently to create a slight mound. Arrange the 0.5 cup toasted walnuts around the edges of each wreath, pressing them lightly into the dough to help hold the shape. Sprinkle the remaining 0.5 tsp granulated sugar (if you have any left) and a pinch of cinnamon over the top of each wreath.
Bake for 25-30 minutes until the tops are golden brown and the filling is bubbling. The edges should be set but still soft to the touch. If the tops brown too quickly, tent them loosely with aluminum foil after 15 minutes to prevent over-browning. The house will smell amazing by this point—trust me, you'll want to take a break and enjoy the aroma.
🍽️ Step 5: Finish and Serve
Remove the wreaths from the oven and let them cool on the baking sheets for 5 minutes. While they're still warm, dust the tops generously with 0.25 cup powdered sugar using a fine-mesh sieve. This creates that beautiful snowy effect that makes your wreath look like it came from a bakery. Let them cool completely on a wire rack before serving.
Slice each wreath into wedges and serve warm with a dollop of whipped cream or a scoop of vanilla ice cream. The contrast of the warm spiced apples with cool dairy is pure autumn perfection. Store any leftovers wrapped tightly in plastic at room temperature for up to 3 days—though I doubt you'll have any left!
Pro Tips For Making Autumn Apple Bread Wreath
- Bloom the Yeast Slowly: Skip the microwave—yeast hates heat. Warm the whole milk to about 105°F (just warm to the touch) and let the yeast sit in it for 5 minutes before mixing with flour. I learned this the hard way after killing yeast with boiling milk and wondering why my dough never rose.
- Toast the Flour First: Lightly toast the all-purpose flour in a dry pan for 2-3 minutes before mixing. This deepens the bread’s flavor and prevents a gummy texture—especially important when you’re adding honey, which can make dough sticky. (Yes, it smells amazing while it cooks.)
- Don’t Overmix the Dough: Once the flour and wet ingredients come together, stop mixing after 2 minutes. Overworking the dough develops gluten too much, and your wreath will turn out dense instead of light and airy. Feel for a shaggy consistency, then let the mixer do the rest.
- Chill the Dough Overnight: If you can, shape the dough and refrigerate it for 12-16 hours before baking. The slow fermentation boosts flavor and makes shaping the wreath easier—no more struggling with sticky dough. (Pro move: wake up to the smell of apples and yeast in the morning.)
Pro cooking tips for autumn apple bread wreath
Dough Temperature Control
The secret to a tender, well-risen wreath starts with your dough's temperature. Keep your workspace at 70-75°F—this helps the yeast activate properly. If your kitchen feels chilly, place your mixing bowl near a warm oven (with light on) for 5 minutes before starting.
I've learned the hard way that cold dough takes forever to proof and yields dense results. Use an instant-read thermometer to check your milk is exactly 110°F—too hot kills the yeast, too cool slows fermentation. 🌡️
Apple Filling Prep
Don't skip the 10-minute rest for your apple filling—it's what makes the difference between soggy bread and perfect texture. While it rests, toss the apples gently to distribute juices evenly. For extra caramelization, I like to add 1 tbsp lemon juice to the filling before baking.
This brightens the apples and prevents them from turning mushy during the long bake. If you're using Granny Smiths, add an extra ½ tsp cinnamon to balance their tartness.
Wreath Assembly Tips
When shaping your dough circles, aim for 12-inch diameter—this creates the perfect balance of structure and softness. Press your thumb into the center firmly to create a well that's about 3 inches wide. This well should hold your filling without spilling over during baking.
For extra stability, press the walnuts into the dough edges first before adding filling—this creates an anchor that keeps your wreath's shape intact during the proofing and baking process.
Baking Perfection
Your oven's rack position matters—place baking sheets on the middle rack for even heat circulation. If your wreath tops brown too quickly, tent with foil after 15 minutes but leave the edges uncovered so they crisp properly. The internal temperature should reach 190-200°F at the center.
I use a thermometer to check—this ensures the filling is hot enough to be safe but not overcooked. The edges should pull away from the pan slightly when done.
Proofing Secrets
Proofing is where the magic happens, but many home bakers rush this step. Your dough should rise until it's about 50% larger in volume and leaves an indentation when gently pressed. If your kitchen is cool, extend proofing time to 90 minutes.
For faster proofing, place your dough in a proofing box (a container with warm water on the bottom) or near a warm oven. Never overproof—dough that's ready to bake springs back slowly when poked.
Finishing Touches
The powdered sugar dusting is non-negotiable for that bakery-fresh look. Use a fine-mesh sieve for an even, snowy effect. For extra flair, add a sprinkle of cinnamon or crushed graham crackers before the sugar. Let your wreath cool completely before slicing—this prevents the filling from oozing out.
Serve warm with vanilla ice cream or whipped cream** for the ultimate autumn treat. The contrast of warm bread with cool dairy is pure comfort food magic. 🍂
Nutrition facts
Frequently asked questions
Can I make this wreath without yeast?
Yes! For a quick version, replace the yeast with 1 tsp baking powder and 1 tsp baking soda in the dough. The texture will be denser but still delicious. For best results, reduce the milk to ½ cup since yeast dough relies on fermentation for rise. The wreath will be more cake-like than bread-like but still perfect for serving.
How do I store leftovers?
Wrap the wreath tightly in plastic wrap and store at room temperature for up to 3 days. For longer storage, slice and freeze individual wedges between parchment paper. Reheat frozen slices in a 350°F oven for 8-10 minutes until warm through. The texture stays best when reheated—it's not quite as tender as fresh but still delicious!
Can I use dried apples instead of fresh?
Fresh apples work best for texture, but you can use dried apples if that's all you have. Soak ½ cup dried apples in warm water for 15 minutes to rehydrate, then drain well. Add 1 tbsp extra honey to the filling to compensate for the reduced moisture. The flavor will be more concentrated, so reduce the sugar in the filling to ¼ cup instead.
Why did my wreath collapse during baking?
This usually happens from one of three issues: underproofed dough, too much filling, or oven temperature fluctuations. First, check your proofing—dough should rise until it's about 50% larger. If your kitchen is cool, extend proofing to 90 minutes. Also, don't overfill the center—press the apples gently so they don't overflow. Finally, ensure your oven is fully preheated and use an oven thermometer to confirm it's at 375°F.
What's the best way to serve this?
Slice the wreath into wedges and serve warm with classic autumn pairings: vanilla ice cream, whipped cream, or caramel sauce. For a savory twist, offer sharp cheddar or brie. The warm spiced apples contrast beautifully with cool dairy—it's pure autumn perfection! For a festive touch, arrange slices on a platter with cinnamon sticks and fresh rosemary sprigs.