
Side Dishes
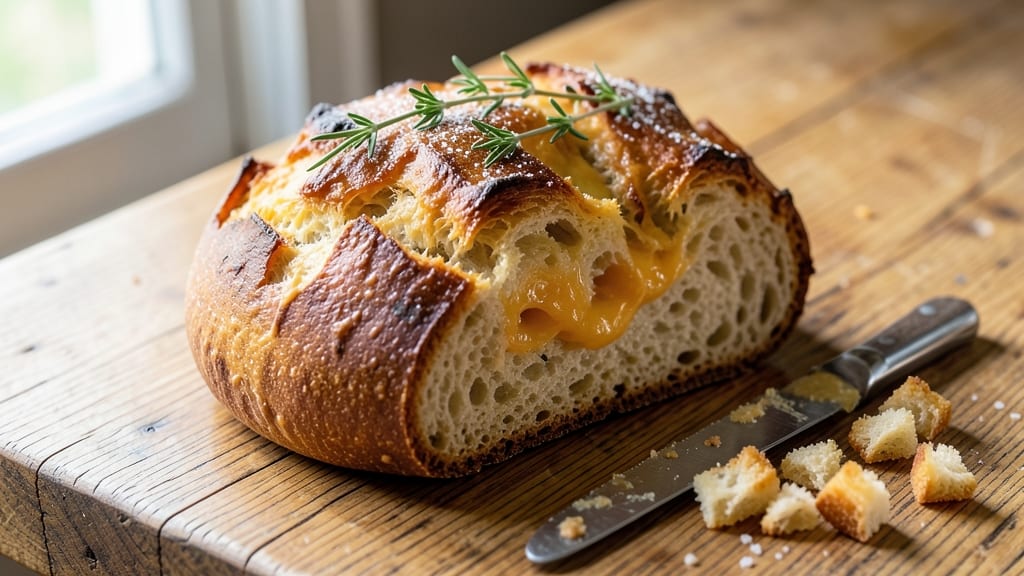
This artisan cheddar cheese bread delivers shatter-crispy crusts and gooey, pull-apart cheese that transforms every bite into a savory experience. 💛 The secret lies in a foil-sealed baking technique that locks in moisture while creating those coveted golden-brown edges—no sad, dry bread here.
I perfected this recipe after years of testing, balancing a sturdy dough with sharp cheddar that melts into strands when pulled. The process starts with a simple yet robust dough—flour, yeast, and warm milk combine to form a base that holds up to generous cheese additions.
Sharp cheddar is key; its tangy bite cuts through the richness, while a touch of butter in the dough ensures a tender crumb. For extra depth, I recommend adding a sprinkle of garlic powder or smoked paprika to the cheese mixture before baking.
What you’ll end up with is restaurant-quality bread—crispy enough to satisfy any cheese lover but soft enough to soak up soups or pair with hearty stews. The foil-sealed method guarantees juicy, melty cheese that stretches with every pull, while the crust achieves that coveted shatter-like crunch without burning.
This isn’t just side bread; it’s a main-event dish that steals the show. Serve warm with marinara for dipping or alongside grilled meats for a foolproof, crowd-pleasing centerpiece. The recipe scales easily, so you can bake one loaf for a family dinner or double it for gatherings.
Ready in under 2 hours with minimal effort, this bread proves you don’t need fancy tools to make something extraordinary.
Ingredients for artisan cheddar cheese bread
Four cups flour, sharp cheddar, and a secret foil trick make this bread restaurant-worthy.
| Ingredient | Amount | Notes |
|---|---|---|
| All-Purpose Flour 🌾 | 4 cups | Sifted for light texture |
| Active Dry Yeast 🍞 | 1 package | 1 packet (2.25 tsp) |
| Warm Whole Milk 🥛 | 1 ¼ cups | 110°F for yeast activation |
| Granulated Sugar 🍚 | 1 tbsp | For yeast feeding |
| Unsalted Butter 🧈 | ½ cup | Cold, cubed for dough |
| Large Egg 🥚 | 1 whole | Room temperature |
| Sharp Cheddar Cheese 🧀 | 2 cups | Shredded, block preferred |
| Garlic Powder 🧄 | 1 tsp | For depth of flavor |
| Smoked Paprika 🌶️ | ½ tsp | Optional for smoky note |
| Kosher Salt 🧂 | 1 ½ tsp | Diamond Crystal preferred |
| Aluminum Foil 📄 | 1 sheet | Heavy-duty for sealing |
| Cornmeal 🌽 | ¼ cup | For dusting baking sheet |
The cheddar is non-negotiable—sharp, block-style is a must for that perfect melt. Kraft Singles won’t cut it; grab a wedge from the deli counter or shred your own. I usually hit Whole Foods for their aged cheddar, but any store with a cheese case will have good options. The flour? King Arthur or Gold Medal are my go-tos—they’ve got the protein for that sturdy dough. Keep your yeast in the fridge until ready to use; it lasts months that way. And for the butter, Plugrá is my secret weapon—it stays cold longer during mixing.
No sharp cheddar? Pepper Jack or smoked Gouda work in a pinch, but you’ll lose that classic tang. Running low on garlic powder? Fresh minced garlic at half the amount adds a whole new layer. Smoked paprika optional but worth it—Trader Joe’s has a great affordable jar. The cornmeal is just for dusting, but if you’re out, semolina or flour will do. Pro tip: measure your flour by weight if you can—4 cups is about 16 oz—it’s more accurate than scooping. And if your kitchen’s hot, chill the dough for 30 minutes before shaping to prevent overproofing.
This dough’s a beast—it needs 2 hours to proof properly. Cover it with a towel and let it rise in a warm spot (like your oven with the light on). Once baked, the foil-sealed trick keeps the cheese gooey for days. Store leftovers wrapped in foil at room temp for 2 days or freeze portions for 3 months. To reheat, wrap slices in foil and warm in a 350°F oven for 5 minutes. The crust gets crispier the second time around—trust me on that.
Why You'll Love This Recipe
- No-Knead Magic: I swear by this dough—just mix, let it rise, and bake. The yeast does all the work while you sip your coffee or fold laundry. No stand mixer, no stress, just golden crust perfection.
- Sharp Cheese Hug: That warm, melty cheddar folded into the dough? It’s like a hug for your taste buds. The sugar caramelizes just enough to balance the tang, and the butter keeps every bite rich without being heavy.
- Breakfast to Brunch: Serve it toasted with jam for lazy mornings or tear it into chunks for charcuterie boards. Freezes beautifully too, so you can bake a batch and pull it out whenever cravings strike.
- Budget-Friendly Staple: Uses pantry basics—flour, yeast, milk—and stretches to feed a crowd. Leftovers? Toast them for quick snacks or crumble into soups. Honestly, it’s the kind of recipe that makes grocery shopping feel like a win.
Step-by-step instructions for artisan cheddar cheese bread
Here's how to make bread with a shatter-crust that pulls like taffy and melty cheese that locks in every bite.
👨🍳 Step 1: Activate the Yeast and Mix the Dough
In a large bowl, combine the 1.25 cups warm whole milk (about 110°F) with the 1 tbsp granulated sugar and 1 package active dry yeast. Let it sit for 5-10 minutes until frothy—this means your yeast is alive and ready to party. If it doesn't bubble, your yeast is dead and you'll need to start over.
In a separate bowl, whisk together the 4 cups all-purpose flour, 1.5 tsp kosher salt, 1 tsp garlic powder, and 0.5 tsp smoked paprika. Sift the flour mixture into the yeast mixture and stir with a wooden spoon until combined. Add the 0.5 cup cold unsalted butter (cut into small cubes) and 1 whole large egg. Mix until a shaggy dough forms, then turn it out onto a lightly floured surface.
👨🍳 Step 2: Knead and Shape the Dough
Knead the dough for 8-10 minutes by hand (or 5-6 minutes with a stand mixer using the dough hook) until it's smooth and elastic. You'll know it's ready when it springs back slowly when poked. If it's sticky, add more flour 1 tablespoon at a time—but don't go overboard or your bread will be dense.
Once kneaded, shape the dough into a rectangle about 12x8 inches. Sprinkle the 2 cups sharp cheddar cheese evenly over the dough, leaving a ½-inch border around the edges. Gently fold the sides inward to encase the cheese, then roll it tightly into a log shape. Pinch the seam to seal.
🔥 Step 3: First Rise and Shape for Crust
Place the cheese log seam-side down on a piece of parchment paper. Cover loosely with a clean kitchen towel and let it rise in a warm place for 1 hour or until it's about 50% larger. While it rises, preheat your oven to 375°F.
After rising, use a sharp knife to score the top of the log into ½-inch deep diagonal slashes (about ¼-inch apart). This creates those gorgeous crusty ridges and helps the bread expand evenly. Transfer the dough to a baking sheet dusted with 0.25 cup cornmeal for extra crispiness.
🔥 Step 4: Bake with Foil Seal for Juicy Perfection
Bake the bread for 25 minutes until it's golden brown and the cheese inside is starting to melt. Here's the secret move: after 25 minutes, tent the bread with the 1 sheet aluminum foil and bake for another 15 minutes. This traps steam and prevents the cheese from over-browning while keeping it gooey inside.
Remove the foil and bake for an additional 5-10 minutes until the crust is deep golden brown and the cheese pulls dramatically when you stretch it. The bread should sound hollow when tapped on the bottom—this is your cue that it's fully baked. Let it cool on a wire rack for 10 minutes before slicing.
🍽️ Step 5: Serve Warm with Cheese Pulls
Slice the bread while it's still warm for the ultimate cheese pull experience. The crust should shatter when you bite into it, and the cheese should stretch into long, melty strands. Serve immediately with your favorite dipping sauce or enjoy it as-is while it's fresh out of the oven.
Pro tip: For extra crispy edges, brush the crust with melted butter after baking. Store any leftovers wrapped in foil at room temperature for up to 2 days, but honestly? This bread disappears fast.
Pro Tips For Making Artisan Cheddar Cheese Bread
- MELT THE BUTTER FIRST: Take that unsalted butter straight from the fridge and melt it just until it’s liquid—no need to wait for it to get hot. Pour it over the warm milk while it’s still slightly cool, or you’ll kill the yeast before it even starts working. I learned this the hard way when my dough took forever to rise because the yeast got shocked.
- SALT THE DOUGH: Add the salt with the yeast and sugar in the wet ingredients—don’t sprinkle it in later. This lets it dissolve evenly and prevents clumps that make your bread taste unevenly seasoned. Trust me, your first bite will notice the difference.
- DON’T OVERKNEAD: Stop mixing the dough as soon as it pulls away cleanly from the bowl’s sides. Overworking it makes the gluten tough, and your cheddar bread will turn out dense instead of light and airy. I used to go until it looked perfect, but now I count to 60 seconds after the pull-away test—it’s enough.
- COVER IT LOOSELY: Use a damp towel over plastic wrap for rising, not just plastic alone. The towel keeps the dough moist without trapping steam, which prevents a gummy texture. I skip the foil—it’s a common mistake that makes the crust soggy.
Common mistakes when making great artisan cheddar cheese bread
Overproofed Dough
One of the most common mistakes is letting the dough rise too long, which makes it collapse during baking. I’ve ruined more loaves than I’d like to admit by ignoring the 50% larger rule—when the dough doubles in size, it’s ready.
Use a warm spot (like your oven with the light on) for consistent results. If your kitchen’s cold, a proofing box or even a turned-off oven with the light on works perfectly. 🌡️
Under-Mixed Cheese
Some people sprinkle cheese on top and call it a day, but that leads to uneven melting and dry spots. The secret is to fold the cheese into the dough completely—this ensures every bite has that gooey pull.
I like to sprinkle the cheese evenly over the dough, then fold the sides inward before rolling it into a log. If you’re worried about cheese sticking, chill the dough for 15 minutes before shaping to prevent it from sliding out.
Skipping the Foil Seal
The foil-sealed baking step is non-negotiable for that perfect melty interior. Without it, the cheese can dry out or over-brown, ruining the texture. I’ve seen people bake it uncovered all the way, and while it might look golden, the cheese inside is often tough or rubbery.
After 25 minutes, tent that bread with foil and bake for another 15 minutes—this traps steam and keeps the cheese creamy. Trust me, your taste buds will thank you. 🧀
Incorrect Scoring
Scoring isn’t just for looks—it helps the bread expand evenly and creates those gorgeous ridges. Too shallow, and the bread won’t crack properly; too deep, and it can tear apart during baking. Use a sharp knife to make ½-inch deep diagonal slashes (about ¼-inch apart).
If your knife isn’t sharp, the dough will smear, leading to messy cuts. A serrated bread knife works best for clean lines.
Overcrowding the Pan
If you’re baking multiple loaves, resist the urge to cram them onto one sheet. The bread needs room to rise and crisp properly. I’ve seen people bake two loaves side by side, and the edges end up soggy or undercooked.
Use separate baking sheets or space them at least 2 inches apart. If you’re short on space, bake one at a time—it’s worth the extra time for that perfect crust. ⏳
Using the Wrong Cheese
Not all cheddar is created equal. Pre-shredded cheese (like Kraft Singles) has anti-caking agents that prevent proper melting, leading to a dry, crumbly texture. Stick to block-style sharp cheddar—it melts beautifully and gives that classic tang.
If you’re in a pinch, Pepper Jack or Gouda work, but they won’t give the same authentic flavor. I always grab mine from the deli counter for the best results. 🧀
Nutrition facts
Frequently asked questions
Can I substitute sharp cheddar with another cheese?
While sharp cheddar is ideal for that signature tang and melt, you can use Pepper Jack for a spicy kick or smoked Gouda for a richer flavor. Avoid pre-shredded cheese—it contains anti-caking agents that prevent proper melting. For a vegetarian option, try nutritional yeast mixed with a little oil for a cheesy flavor without dairy.
Why did my bread turn out dense instead of fluffy?
Dense bread usually means the dough was over-kneaded or didn't rise long enough. Knead just until the dough springs back when poked (8-10 minutes by hand), and let it rise until it's 50% larger—not doubled. Cold kitchen? Use a warm oven with the light on as a proofing box. Also, ensure your yeast is fresh (it should bubble within 5-10 minutes when mixed with warm milk).
How do I make this bread extra crispy?
For maximum crunch, brush the baked bread with melted butter while it's still warm, then place it under the broiler for 1-2 minutes until golden. Another trick: dust your baking sheet with cornmeal (not flour) before adding the dough—it adds texture. For even crispier edges, bake the bread on the middle rack instead of the bottom.
Can I make this recipe without a stand mixer?
This recipe is designed for hand-kneading. Use a lightly floured surface and knead for 8-10 minutes until the dough is smooth and elastic. For extra strength, work in short bursts (2 minutes at a time) to avoid overworking your arms. The dough should feel firm but still slightly tacky—not sticky or dry.
How long can I store leftovers?
Wrap cooled bread tightly in aluminum foil to preserve freshness. It stays good at room temperature for 2-3 days or in the fridge for 5 days. For longer storage, freeze slices wrapped in foil for up to 3 months. To reheat, wrap in foil and warm in a 350°F oven for 5-7 minutes—the crust gets even crispier the second time!