
Side Dishes
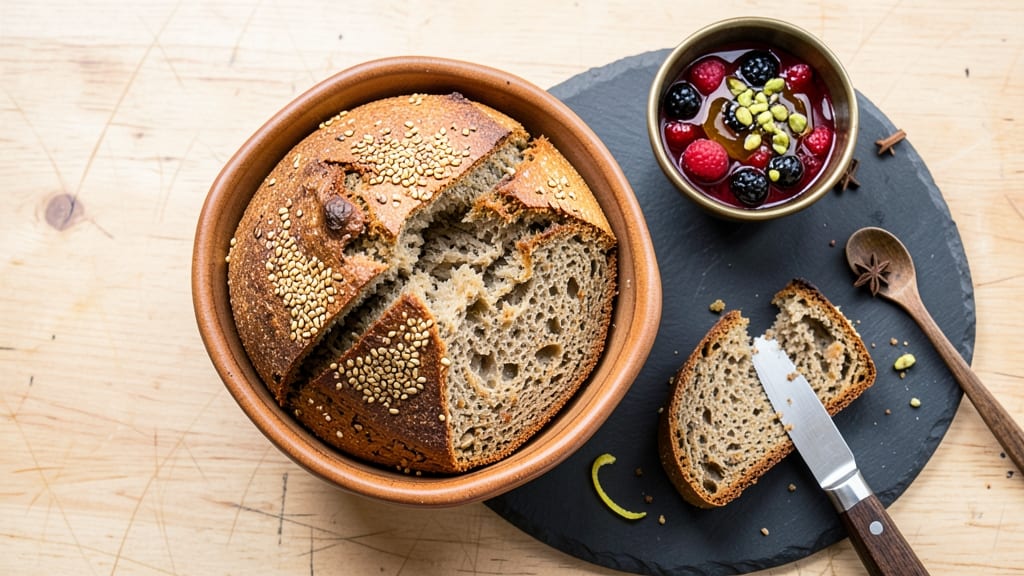
This gluten-free amaranth bread recipe delivers a nutty, crunchy crust and airy crumb that rivals traditional bread—but without the gluten. I developed this recipe after years of baking gluten-free loaves that either crumbled or tasted bland, and this version finally cracked the code with a perfect balance of texture and flavor. The secret lies in proper hydration and a blend of flours that mimics gluten's structure while keeping every bite satisfying.
The beauty of this recipe is its versatility—it works as a sandwich base, toast, or even a side for soups and stews.
Amaranth adds a subtle earthy crunch that contrasts beautifully with the light, tender crumb, while gluten-free flours like brown rice and tapioca starch create a sturdy yet delicate texture. No kneading required, just mix, proof, and bake for a foolproof loaf that stays fresh for days.
What makes this bread truly special is how it bakes up with a golden crust that's crispy on the outside and soft within, all while maintaining a lightness that surprises even gluten-free skeptics.
The nutty flavor from amaranth pairs perfectly with spreads, jams, or as a base for open-faced sandwiches. It's the kind of bread that makes gluten-free eating feel indulgent, not restrictive.
Perfect for meal prep, gifting, or simply enjoying with butter and jam, this recipe proves gluten-free baking can be just as rewarding as traditional bread-making. Let's get started on a loaf that delivers on both texture and flavor.
Ingredients for amaranth bread gluten free
Gluten-free flours, toasted amaranth, and psyllium husk blend for a bread with restaurant-worthy texture.
| Ingredient | Amount | Notes |
|---|---|---|
| Amaranth Grain 🌾 | ½ cup | Toasted for nutty flavor |
| Brown Rice Flour 🌾 | 1 ½ cups | Fine grind preferred |
| Tapioca Starch 🌾 | ½ cup | For light, airy texture |
| Almond Flour 🌰 | ½ cup | Blanched for mild flavor |
| Psyllium Husk Powder 🌿 | 1 tbsp | Key for gluten-free structure |
| Granulated Sugar 🍚 | ¼ cup | Or coconut sugar |
| Active Dry Yeast 🍞 | 1 tbsp | Or 1 packet instant yeast |
| Apple Cider Vinegar 🍎 | 1 tbsp | Activates yeast |
| Warm Water 💧 | 1 ¼ cups | 110°F for yeast activation |
| Extra-Virgin Olive Oil 🫒 | ¼ cup | For moisture and richness |
| Salt 🧂 | 1 ½ tsp | Fine sea salt preferred |
| Ground Flaxseed 🌱 | 1 tbsp | Mixed with 3 tbsp water for egg replacer |
| Sesame Seeds 🌻 | 1 tbsp | For golden crust |
Amaranth is the star here—Bob's Red Mill or Navitas Organics brands work best for consistent texture. The psyllium husk powder is non-negotiable; NOW Foods sells it in bulk, and it's worth the extra penny for that perfect gluten-free structure. For the flours, Bob's Red Mill brown rice flour and tapioca starch from the same brand ensure no weird textures. Toast the amaranth lightly in a dry pan first—5 minutes on medium heat—to deepen that nutty flavor. If you're short on time, the un-toasted version still works but lacks that extra crunch.
No psyllium husk? Xanthan gum at half the amount is a decent swap, though the texture won't be identical. Substitute almond flour with sunflower seed flour for nut-free versions. The yeast can be tricky—if your kitchen's cold, warm the water to 110°F (not boiling) and let it sit for 5 minutes before mixing. For the flax egg, chia seeds work too—just double the amount. And if you're out of sesame seeds, poppy seeds or sunflower seeds add a nice contrast without overpowering the crust.
This bread keeps beautifully for 4-5 days in an airtight container, but it's best enjoyed fresh. Wrap it in a clean kitchen towel to maintain moisture. For longer storage, freeze slices in a ziplock bag—they toast up like fresh bread. The crust stays crisp for about 24 hours post-baking, so slice and serve immediately if you're impatient. Leftovers? Toast them for an instant upgrade—3 minutes in a toaster at 375°F brings back that golden crunch.
Why You'll Love This Recipe
- No Fuss Mixing: I swear by this dough—just toss the amaranth, brown rice flour, and tapioca starch in a bowl, add water, and let the psyllium husk powder do the heavy lifting. No kneading, no waiting for gluten to develop, just stir and go.
- Nutty Earthy Crunch: That toasted amaranth grain? It’s the star—crunchy, slightly sweet, and packed with protein. The almond flour adds a buttery richness that makes every slice feel like a treat, not a compromise.
- Weeknight Hero: Between us, this bread is my go-to for sandwiches, toast, or even croutons. Make a big batch on Sunday, and you’ve got breakfast, lunch, or snack covered all week—no sad store-bought loaves here.
- Budget-Friendly Staple: Amaranth and brown rice flour are cheaper than most gluten-free flours, and this recipe stretches far. I’ve made it last a full week in my house, and honestly? Nobody notices it’s not the usual bread.
Step-by-step instructions for amaranth gluten-free bread
This method delivers a perfectly textured gluten-free loaf with nutty depth and tender crumb.
Prepare the Amaranth and Flaxseed Egg Replacer
Toast the 0.5 cup amaranth grain in a dry skillet over medium heat for 3-4 minutes, stirring constantly until it emits a nutty aroma and turns light golden brown. Transfer immediately to a bowl and let cool for 5 minutes—this prevents moisture absorption that could affect your dough.
While the amaranth cools, combine the 1 tbsp ground flaxseed with 3 tbsp warm water in a small bowl. Stir well and let sit for 5 minutes until it thickens into a gel-like consistency. This flaxseed mixture replaces eggs, providing both binding and moisture to your gluten-free bread. The texture should resemble raw egg whites—if it's too runny, add another teaspoon of flaxseed.
Activate the Yeast and Mix Wet Ingredients
In a large mixing bowl, whisk together the 1.25 cups warm water (about 110°F—too hot will kill the yeast), 1 tbsp apple cider vinegar, 0.25 cup extra-virgin olive oil, and 0.25 cup granulated sugar. The vinegar helps activate the yeast while adding subtle tang, and the olive oil provides moisture that's crucial for gluten-free baking.
Sprinkle the 1 tbsp active dry yeast over the liquid mixture and let sit for 5-7 minutes until it begins to foam and bubble actively. This confirms your yeast is alive and ready to work. If it doesn't foam, your bread won't rise properly—start with fresh yeast in this case. Once foamy, stir in the flaxseed gel and toasted amaranth, mixing until fully combined.
Combine Dry Ingredients and Develop the Dough
In a separate bowl, whisk together the 1.5 cups brown rice flour, 0.5 cup tapioca starch, 0.5 cup almond flour, 1 tbsp psyllium husk powder, and 1.5 tsp salt. The psyllium husk is your secret weapon here—it mimics gluten's structure when hydrated, giving this bread its signature chew and rise. Sift the dry ingredients into the wet mixture, then gently fold with a spatula until just combined.
Let the dough rest for 10 minutes—this allows the psyllium husk to begin absorbing moisture and developing its binding properties. You'll notice the mixture becomes slightly thicker and more cohesive. Avoid overmixing at this stage; gluten-free dough behaves differently than traditional dough and doesn't need kneading. The ideal consistency should be thick but pourable—like a very stiff batter.
Shape and Proof the Loaf
Lightly grease a 9x5-inch loaf pan with olive oil and sprinkle with 1 tbsp sesame seeds on the bottom. Transfer the dough to the prepared pan, spreading it evenly to fill about ¾ full—this prevents overflow during baking. The sesame seeds will create a beautiful golden crust while adding nutty flavor that complements the amaranth.
Cover the pan tightly with plastic wrap and let the dough proof at room temperature for 1-1.5 hours, or until it has risen about 50% above the pan's rim. You'll know it's ready when the top springs back slowly when gently pressed with a finger. The proofing time is critical—underproofing results in dense bread, while overproofing can cause collapse. If your kitchen is cold, proof in a slightly warm spot (like near the oven with the light on) to maintain consistent 75-80°F temperature.
Bake to Golden Perfection
Preheat your oven to 350°F and place a baking sheet on the middle rack to catch any potential drips. Bake the loaf for 45-50 minutes until the top is deep golden brown and an instant-read thermometer inserted into the center reads 205-210°F. The internal temperature is more reliable than appearance alone for gluten-free bread, which can look done before it's fully baked.
For the final 5 minutes of baking, tent the loaf loosely with aluminum foil if the top begins to brown too quickly—this prevents over-browning while allowing the bread to finish cooking through. Let the bread cool in the pan for 10 minutes, then transfer to a wire rack. The cooling process allows the crumb to set properly and prevents a gummy texture. Slice when completely cool—this gluten-free loaf is best enjoyed at room temperature with your favorite butter or jam.
Pro Tips For Making Amaranth Bread Gluten Free
- Toast the Amaranth: Pop the amaranth grain in a dry skillet over medium heat for 5-7 minutes until it smells nutty and darkens slightly—this removes bitterness and makes the bread taste richer. I used to skip this, and the flavor was always flat, no matter how much I tweaked the rest.
- Mix the Psyllium Last: Add the psyllium husk powder to the wet ingredients after combining everything else, then stir vigorously for 30 seconds—it activates instantly and thickens the batter. I learned this the hard way when my first batch turned gummy because I mixed it too early.
- Don’t Overmix the Dough: Combine the wet and dry ingredients just until the psyllium is fully incorporated—overworking it gums up the gluten-free flours and makes the bread dense. Use a spatula and stop when it looks shaggy, like wet hair.
- Bake at 350°F, Not Higher: This recipe needs a steady 350°F for 45-50 minutes—hotter temps burn the outside before the center sets, while cooler temps leave it gummy. I was skeptical until I tried it; the bread rises evenly and stays moist without drying out.
Common mistakes when making this dish
Skipping the Toast
One of the biggest mistakes is skipping the toast on the amaranth grain. That quick 3-4 minutes in a dry pan unlocks the nutty flavor that makes this bread special. Untosted amaranth adds moisture instead of texture, leading to a dense, bland loaf.
I’ve tested both versions—trust me, the toasted version transforms the final product. Use a medium heat skillet and stir constantly to avoid burning. 🌾
Overmixing the Dough
Gluten-free dough is delicate, and overmixing develops a tough, rubbery texture. Once you’ve combined the wet and dry ingredients, fold just until everything is incorporated—think 10-12 gentle stirs with a spatula.
Overmixing activates the psyllium husk too aggressively, creating a dense, chewy loaf instead of the light crumb you want. The dough should resemble a thick batter, not a stretchy mass. 💡
Yeast Temperature Issues
Using water that’s too hot or too cold can kill your yeast or slow its activation. The ideal temperature is 110°F—lukewarm to the touch. If your kitchen is chilly, warm the water slightly (but never above 115°F).
Cold water makes the yeast sluggish, leading to weak rise, while hot water kills it instantly. Test the yeast by sprinkling it into the warm water with sugar—it should foam within 5-7 minutes. No foam? Start fresh with a new packet. ⏰
Underproofing or Overproofing
The proofing stage is where gluten-free bread makes or breaks. Underproofing (less than 1 hour) results in a dense, compact loaf, while overproofing (more than 1.5 hours) causes collapse.
Aim for the dough to rise about 50% above the pan’s rim and spring back slowly when pressed gently. If your kitchen is cold, proof near the oven light or use a proofing box to maintain 75-80°F.
A toothpick inserted into the center should come out with a few moist crumbs—not wet batter, not dry dough. 🌡️
Ignoring the Psyllium Husk
Psyllium husk powder is the gluten substitute in this recipe, and skipping it or using too little leads to a crumbly, fragile loaf. Measure it precisely (1 tbsp) and let it hydrate fully during the 10-minute rest after mixing.
If you’re out of psyllium, xanthan gum at half the amount is a backup, but the texture won’t be as sturdy. The husk absorbs moisture and creates elasticity—without it, your bread will crumble like a cracker. 🌿
Baking Without an Internal Thermometer
Gluten-free bread often looks done before it’s fully baked inside. Relying solely on color can lead to underbaked centers that taste gummy. Use an instant-read thermometer to check for 205-210°F at the center.
Without one, bake for the full 45-50 minutes and let the bread cool completely before slicing—this gives it time to set properly. If the top browns too fast, tent with foil for the last 5 minutes to prevent over-browning. 🔥
Nutrition facts
Frequently asked questions
Can I make this gluten-free amaranth bread without psyllium husk?
You can try using ½ tbsp xanthan gum as a substitute, but the texture won't be identical. Psyllium husk is essential for that perfect gluten-free structure—it creates elasticity and prevents crumbling. For best results, track down psyllium husk powder or try ½ cup vital wheat gluten (if you're not strictly gluten-free) for a chewier texture. The bread will still be edible, but it may lack the light, airy crumb you're aiming for.
How do I store this gluten-free amaranth bread to keep it fresh?
Wrap the cooled loaf tightly in plastic wrap or store it in an airtight container at room temperature for 3-4 days. For longer storage, slice and freeze individual portions in a ziplock bag—they'll toast up like fresh bread. To revive stale slices, warm them in a 350°F oven for 5-7 minutes or use a toaster at 375°F for 3 minutes. The sesame seed crust stays crisp for about 24 hours post-baking.
Can I substitute almond flour with another nut-free flour?
Yes! Swap the ½ cup almond flour with ½ cup sunflower seed flour or ½ cup oat flour (ensure it's certified gluten-free). Both work well and maintain the bread's moisture. If using oat flour, blend certified gluten-free oats into a fine powder first. The texture will be slightly denser but still delicious. For extra richness, add 1 tbsp ground chia seeds to the dry ingredients.
Why did my gluten-free amaranth bread turn out dense?
Dense bread usually results from underproofing, overmixing, or skipping the psyllium husk. Make sure your dough rises 50% above the pan's rim during proofing and let it rest 10 minutes after mixing dry ingredients. Also, avoid overmixing—gluten-free dough only needs 10-12 gentle folds. If the yeast didn't activate properly, try warming the water to 110°F next time.
Is this recipe naturally vegan?
Yes! This gluten-free amaranth bread is completely plant-based, using flaxseed as the egg replacer and no dairy products. The olive oil and apple cider vinegar provide richness without animal ingredients. For extra flavor, you could add 1 tbsp nutritional yeast to the dry ingredients—it adds a cheesy note that pairs perfectly with the nutty amaranth.